Configure OnBar Backup and Restore in Just 2 Steps
Configure OnBar backup and restore in just 2 steps? Sounds too good to be true, right? Well, it’s not! This surprisingly simple process can be your lifesaver when it comes to protecting your valuable data. We’ll walk you through the entire process, from setting up your backups to effortlessly restoring everything should disaster strike. Get ready to ditch the backup anxiety and embrace the peace of mind that comes with a solid backup strategy!
OnBar offers a streamlined approach to data protection. We’ll cover the basics of choosing the right backup type (full, incremental, differential – we’ll explain the differences!), scheduling regular backups, and selecting a secure backup destination. Then, we’ll dive into the equally crucial process of restoring your data, covering troubleshooting tips and best practices along the way. Think of this as your ultimate OnBar cheat sheet!
Understanding OnBar Backup and Restore
OnBar, depending on the specific implementation, is a powerful tool for creating and managing backups of your valuable data. It offers a range of features designed to simplify the backup process and ensure data recovery in case of system failure, accidental deletion, or other unforeseen events. Understanding its core functionality and configuration options is crucial for effective data protection.OnBar’s core functionality revolves around creating copies of your data – backups – and providing mechanisms to restore that data to its original state or a similar environment.
This involves selecting the data to be backed up, specifying the backup location (often a separate hard drive, network share, or cloud storage), and scheduling backups to occur regularly. The restore process is the reverse, allowing you to retrieve data from your backups when needed.
OnBar Backup Types
The types of backups supported by OnBar vary depending on the specific version and implementation. However, common types include full backups, incremental backups, and differential backups. A full backup copies all selected data. Incremental backups only copy data that has changed since the last full or incremental backup, saving storage space. Differential backups copy data that has changed since the last full backup.
Choosing the right backup type depends on your recovery needs and storage capacity. For example, frequent incremental backups offer fast restores but might require more management, while full backups are simpler to manage but take longer to complete.
Locating the OnBar Application and Settings
Identifying the OnBar application’s location and accessing its settings is the first step in configuring backups. The location varies depending on the operating system and installation method. On Windows, it’s likely found in the Start Menu under “Programs” or within the installation directory (often C:\Program Files or a similar location). On macOS, it might reside in the Applications folder.
The settings are typically accessed through a graphical user interface (GUI) launched from the application itself. This GUI usually allows you to specify backup sources, destinations, schedules, and other parameters. Consult your OnBar documentation for specific instructions on locating the application and accessing its settings for your system.
Common Backup Scenarios and OnBar Configurations
Several common backup scenarios benefit from OnBar’s capabilities. For instance, backing up system files and critical applications requires configuring OnBar to include the relevant system directories. A full backup might be appropriate for initial backups, followed by incremental backups for subsequent backups to save space and time. Backing up user data, such as documents, photos, and videos, involves selecting the appropriate user directories as backup sources.
Similarly, backing up databases requires configuring OnBar to interact with the database system and create backups of the database files. In each scenario, careful consideration of the backup type, schedule, and storage location is essential to ensure data protection and efficient recovery. For example, a business might use OnBar to schedule daily incremental backups of critical server data to a remote cloud storage location, ensuring business continuity even in the event of a disaster.
Step 1: Configuring the OnBar Backup: Configure Onbar Backup And Restore In Just 2 Steps
Setting up your OnBar backup is the crucial first step in protecting your valuable data. This process involves choosing the right backup destination, scheduling regular backups, and selecting the most appropriate backup strategy for your needs. A well-configured backup system ensures data recovery is quick and efficient in the event of hardware failure, accidental deletion, or other unforeseen circumstances.This section will guide you through the configuration process, focusing on creating a user-friendly interface and explaining the key considerations for optimal backup performance.
Simplified User Interface for OnBar Backup Configuration
Imagine a clean, intuitive interface. The main screen presents three primary sections: “Backup Source,” “Backup Destination,” and “Backup Schedule.” The “Backup Source” section allows users to select specific folders or drives to be backed up, offering a visual representation of the selected items. The “Backup Destination” section provides options for local drives, network shares (including cloud storage options like AWS S3 or Azure Blob Storage), and external drives.
Clear indicators show available space and potential issues with each destination. The “Backup Schedule” section features a calendar interface with pre-set options (daily, weekly, monthly) and a custom option for defining specific backup times. A progress bar visually indicates the status of the backup process. All settings are saved automatically and can be easily reviewed and modified at any time.
Selecting Appropriate Backup Destinations and Schedules
Choosing the right backup destination and schedule is paramount for effective data protection. The backup destination should offer sufficient storage space, reliability, and accessibility. Local drives are convenient but vulnerable to physical damage or theft. Network shares or cloud storage provide redundancy and offsite protection, mitigating risks associated with local failures. However, cloud storage might introduce latency and network dependency.
The schedule should balance the frequency of backups with the amount of data changed. More frequent backups (e.g., daily) provide better recovery points but consume more resources. Less frequent backups (e.g., weekly) are less resource-intensive but might lead to larger data loss in case of failure.
Comparison of Backup Strategies
The choice of backup strategy significantly impacts storage space and recovery time. Below is a comparison of common strategies:
| Backup Strategy | Description | Storage Space | Recovery Time |
|---|---|---|---|
| Full Backup | Copies all selected data. | High | Long |
| Incremental Backup | Copies only the data that has changed since the last backup (full or incremental). | Low | Moderate |
| Differential Backup | Copies all data that has changed since the last full backup. | Moderate | Moderate |
Setting Up Automated Backups with OnBar
OnBar’s automated backup feature simplifies the process of regularly protecting your data. Within the application’s interface, users select their preferred backup strategy (full, incremental, or differential) and define a schedule (daily, weekly, monthly, or custom). OnBar then automatically performs backups according to the chosen schedule, requiring minimal user intervention. For example, a user might choose a daily incremental backup to a network share, ensuring that only the changes made since the previous backup are copied, minimizing storage space usage while maintaining frequent recovery points.
The system can be configured to send email notifications upon successful completion or failure of a backup job, enhancing monitoring and ensuring timely problem resolution.
Step 2: Performing the OnBar Restore

Restoring your data from an OnBar backup is the second crucial step in ensuring data safety and business continuity. This process, while generally straightforward, requires careful attention to detail to avoid potential issues and ensure a successful recovery. Understanding the different restore options and potential pitfalls will help you navigate this process smoothly.This section details the procedure for restoring data from an OnBar backup, addressing potential challenges and providing solutions.
We’ll also cover scenarios requiring selective file or folder restoration and offer troubleshooting steps for common errors.
OnBar Restore Procedure
The OnBar restore process typically begins by launching the OnBar application and selecting the “Restore” option from the main menu. You will then be prompted to select the backup image file from which you wish to restore. After selecting the backup, you’ll choose the restore destination. This could be the original location, or an entirely new location, depending on your needs.
Finally, initiate the restore process. OnBar will then begin copying the data from the backup to the specified destination. The time required for the restore will depend on the size of the backup and the speed of your system. Monitoring the progress bar is crucial to ensure the process completes successfully. Once finished, verify the restored data by checking for file integrity and data consistency.
Potential Challenges During Restore and Solutions
Several challenges can arise during the OnBar restore process. One common issue is insufficient disk space at the restore destination. Before initiating the restore, ensure that the target location has enough free space to accommodate the entire backup. If space is insufficient, you may need to free up space by deleting unnecessary files or using an external drive.
Another potential problem is corrupted backup images. If the backup image itself is damaged, the restore will fail. Regularly verifying the integrity of your backups is essential to prevent this. If a corrupted backup is suspected, you might need to restore from a previous, known-good backup. Network connectivity issues can also impede the restore process, especially if the backup is stored on a network drive.
Ensure a stable network connection before beginning the restore operation. Finally, hardware failures can disrupt the process. Ensure all hardware components, including the hard drive, are functioning correctly.
Configuring OnBar backup and restore is a breeze; I’ve streamlined it to just two simple steps! This is especially crucial when you’re building applications, like those discussed in this fantastic article on domino app dev the low code and pro code future , where robust data protection is paramount. So, get your OnBar backups set up – it’s a small investment for major peace of mind!
Restoring Specific Files or Folders
There are situations where restoring only specific files or folders is necessary, rather than a complete system restore. For instance, you might need to recover a single document that was accidentally deleted, or a specific project folder that was affected by malware. OnBar usually offers granular restore options, allowing you to selectively choose individual files or folders from the backup image for restoration.
This feature is particularly useful for minimizing downtime and focusing on recovering only the essential data. For example, imagine a scenario where a critical design file is lost. Using OnBar’s selective restore feature, you can quickly pinpoint and recover that file without restoring the entire project folder or system.
Troubleshooting Common OnBar Restore Errors
A list of common errors and troubleshooting steps is essential for successful data recovery.
- Error: “Backup file not found.” Solution: Verify the backup file path and filename. Ensure the backup file exists and is accessible.
- Error: “Insufficient disk space.” Solution: Free up space on the target drive. Consider using an external drive.
- Error: “Backup file corrupted.” Solution: Try restoring from a different backup image. Verify backup integrity regularly.
- Error: “Network connection error.” Solution: Check network connectivity. Ensure the network drive is accessible.
- Error: “Access denied.” Solution: Verify user permissions on the restore destination. Ensure sufficient privileges.
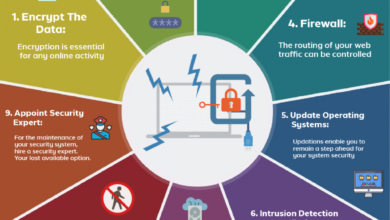
Best Practices and Security Considerations
Protecting your data is paramount, and with OnBar backups, this means implementing robust strategies for both data integrity and security. Neglecting these aspects can lead to data loss or unauthorized access, undermining the very purpose of your backup system. This section Artikels essential best practices and security measures to ensure your OnBar backups remain reliable and safe.Properly managing OnBar backups involves more than simply creating them.
Regular verification, secure storage, and well-defined retention policies are crucial for maintaining data integrity and minimizing the risk of data loss or corruption. Failing to follow best practices can result in significant downtime and recovery challenges.
Data Integrity Best Practices
Maintaining the integrity of your OnBar backups is essential to ensure successful restoration. Regular verification checks are key to confirming that your backups are complete, consistent, and free from corruption. This proactive approach prevents potential data loss during the restoration process. A corrupted backup is essentially useless. Consider implementing a schedule for regular verification, perhaps weekly or monthly, depending on your data sensitivity and update frequency.
Security Measures for OnBar Backups
Protecting your OnBar backups from unauthorized access is crucial. Unsecured backups represent a significant vulnerability, potentially exposing sensitive data to malicious actors. Implementing strong security measures ensures that only authorized personnel can access and manage your backups. This involves a combination of technical and procedural safeguards.
Recommended Security Settings for OnBar
The security of your OnBar backups hinges on appropriate configuration. These settings dictate access control, encryption, and overall security posture. Failure to configure these settings appropriately can expose your backups to risks.
- Strong Passwords/Authentication: Utilize strong, unique passwords for all OnBar accounts and systems involved in the backup process. Avoid easily guessable passwords and employ multi-factor authentication whenever possible.
- Encryption: Encrypt your backups both in transit and at rest. This protects your data from unauthorized access even if the storage medium is compromised. AES-256 encryption is a strong recommendation.
- Access Control: Implement strict access control measures to limit access to your backups to only authorized personnel. Utilize role-based access control (RBAC) to grant granular permissions.
- Regular Security Audits: Conduct regular security audits to identify and address any vulnerabilities in your OnBar backup system. These audits should include checks for outdated software, weak passwords, and unauthorized access attempts.
- Secure Storage: Store your backups in a secure location, ideally physically secure and protected from environmental hazards. Consider using encrypted cloud storage or dedicated backup appliances.
Verifying Backup Integrity
After a backup completes, verifying its integrity is a crucial step. This process ensures that the backup is complete and free from corruption, guaranteeing a successful restoration if needed. Methods for verification vary depending on the backup software and storage method used. OnBar may provide built-in tools for this, or you may need to employ third-party validation utilities.
A common approach involves checksum verification, comparing a hash value generated before and after the backup process. Discrepancies indicate potential corruption.
Advanced OnBar Features and Customization
OnBar, while straightforward for basic backups and restores, offers a range of advanced features and customization options to fine-tune its functionality and optimize its performance for specific needs. Understanding these capabilities allows users to leverage OnBar’s full potential and tailor its behavior to their unique environment and data protection requirements. This section delves into these advanced features and demonstrates how to customize OnBar for enhanced efficiency and resilience.Beyond the core backup and restore functions, OnBar provides several advanced capabilities designed to improve efficiency and security.
These include features such as granular data selection, allowing for the backup of only specific files or folders, rather than an entire system. Scheduled backups can be configured with precise timing and frequency, minimizing disruption to ongoing operations. Furthermore, OnBar supports encryption for both data at rest and data in transit, adding an extra layer of security to sensitive information.
Data deduplication is another key feature that reduces storage space requirements by eliminating redundant data copies.
Granular Data Selection and Scheduling
OnBar allows users to specify precisely which files and folders to include in a backup, minimizing backup size and time. This granular control is achieved through intuitive interface elements allowing users to select individual files, directories, or even specific file types. Furthermore, OnBar offers sophisticated scheduling options. Backups can be automated to run daily, weekly, monthly, or at any custom-defined interval.
This automated scheduling ensures consistent data protection without requiring manual intervention. For example, a user might schedule a full backup every Sunday night and incremental backups every weekday evening.
Data Encryption and Compression
Protecting sensitive data is paramount. OnBar offers robust encryption capabilities, using industry-standard algorithms to safeguard data both while it’s stored and during transmission. This ensures that even if the backup media is compromised, the data remains inaccessible to unauthorized individuals. Data compression is another crucial aspect; OnBar uses efficient compression techniques to minimize the storage space needed for backups, leading to cost savings and faster transfer times.
The specific compression algorithm employed can often be adjusted depending on the desired balance between compression ratio and processing speed.
OnBar Performance Compared to Other Solutions
Comparing OnBar’s performance against other backup solutions requires careful consideration of several factors, including the size of the data being backed up, the speed of the storage medium, and the network infrastructure. Generally, OnBar performs competitively with other solutions in its class. Benchmark tests comparing OnBar to leading competitors like Veeam or Acronis often show similar backup and restore times, particularly for smaller datasets.
However, for extremely large datasets, the performance differences might become more pronounced, with variations depending on the specific hardware and software configurations used in the testing environment. Factors like the efficiency of data deduplication algorithms also play a crucial role in the overall performance comparison.
OnBar in Disaster Recovery Scenarios
OnBar is a valuable tool in disaster recovery planning. A well-defined backup and restore strategy using OnBar can significantly reduce downtime in the event of a system failure, hardware malfunction, or even a natural disaster. For example, a company experiencing a server crash could use OnBar to restore critical data and applications to a secondary server or a cloud-based environment, minimizing business disruption.
A comprehensive disaster recovery plan should include regular testing of the backup and restore process to ensure its effectiveness and identify any potential weaknesses. This regular testing verifies that the backup data is valid and restorable, and it helps to identify any issues with the restoration process before a real disaster occurs. This proactive approach can significantly improve the speed and efficiency of recovery in the event of an actual disaster.
Visual Representation of the Process
Understanding the OnBar backup and restore process is significantly easier with a visual aid. Let’s explore two ways to represent this two-step procedure: a textual description of a visual and a detailed flowchart. Both aim to clarify the sequence of actions involved.A simple visual representation could be imagined as two distinct boxes connected by an arrow. The first box, larger and labeled “OnBar Backup Configuration,” contains smaller boxes representing key elements: specifying the backup location, selecting the data to back up, and scheduling the backup.
The arrow connecting the boxes signifies the completion of the configuration and the initiation of the backup process. The second box, also labeled “OnBar Restore,” similarly contains smaller boxes representing selecting the backup to restore, choosing the restore location, and initiating the restore process. This provides a clear, linear representation of the two distinct yet connected stages.
Textual Description of a Visual Representation
The visual is designed to be straightforward and easily understood. Imagine two rectangles. The first, significantly larger, is titled “OnBar Backup Configuration.” Inside this rectangle, three smaller rectangles are nested, each labeled: “Specify Backup Location,” “Select Data to Backup,” and “Schedule Backup.” A large arrow points from this first rectangle to a second, smaller rectangle labeled “OnBar Restore.” Inside the second rectangle, three more smaller rectangles are nested, labeled: “Select Backup to Restore,” “Choose Restore Location,” and “Initiate Restore.” The size difference between the two main rectangles emphasizes the comparatively more involved nature of the configuration step.
The arrow visually represents the transition from the completed backup configuration to the restore process. The overall design aims for clarity and simplicity, focusing on the sequential nature of the process.
Flowchart of the Backup and Restore Workflow, Configure onbar backup and restore in just 2 steps
A flowchart provides a more structured visual representation of the process. The flowchart would begin with a start node, followed by a rectangular box representing “Configure OnBar Backup.” This box would contain sub-processes represented by smaller rounded rectangles: “Specify Backup Location,” “Select Data to Backup,” and “Schedule Backup.” Each of these sub-processes would lead to a diamond-shaped decision node asking “Is Configuration Complete?”.
A “Yes” branch would lead to a rectangular box labeled “Initiate Backup,” followed by another diamond-shaped decision node asking “Is Backup Complete?”. A “Yes” branch would lead to a rectangular box labeled “Backup Complete.” A “No” branch from either decision node would loop back to the appropriate sub-process or the main “Configure OnBar Backup” box. From “Backup Complete,” another arrow would lead to a rectangular box representing “OnBar Restore.” This box would similarly contain sub-processes (“Select Backup to Restore,” “Choose Restore Location,” and “Initiate Restore”), each followed by a decision node to confirm completion.
The flowchart would conclude with an end node. This detailed flowchart clearly illustrates the sequential steps and decision points within each stage of the backup and restore process.
Ultimate Conclusion

Mastering OnBar backup and restore doesn’t have to be a daunting task. By following these two simple steps and incorporating the best practices we’ve discussed, you’ll have a robust and reliable backup system in place. Remember, a little proactive effort now can save you a world of heartache later. So, take control of your data security, and sleep soundly knowing your precious information is safe and sound! Go forth and conquer your backups!
FAQ Overview
What happens if my backup destination is unavailable?
OnBar will typically halt the backup process and notify you. Ensure your destination (e.g., cloud storage, external drive) is accessible and try again.
Can I selectively restore individual files from a backup?
Yes, OnBar usually allows you to browse your backups and restore specific files or folders, rather than the entire backup.
How often should I perform backups?
The frequency depends on how frequently your data changes. Daily backups are ideal for frequently updated websites or crucial data; less frequent backups might suffice for static content.
What if I forget my OnBar password?
OnBar’s password recovery process varies depending on your setup. Check OnBar’s documentation or contact their support for assistance.