More Options for Terminal Screen Size
More options for terminal screen size? Yeah, I know, it sounds kinda nerdy, but trust me, this is a game-changer for anyone who spends any serious time in the command line. We’re talking about making that black and white box your own personal productivity paradise. This isn’t just about making things bigger or smaller; it’s about optimizing your workflow, improving readability, and ultimately, making your coding life (or whatever terminal-based task you’re tackling) significantly more enjoyable.
This post dives deep into the various ways you can tweak and customize your terminal’s screen size and appearance. We’ll explore different terminal emulators, delve into font and character size adjustments, and uncover the secrets of terminal multiplexers for managing multiple sessions efficiently. We’ll even cover some advanced techniques to squeeze every last pixel of usable space from your terminal window, no matter your screen resolution or DPI settings.
Get ready to unleash the full potential of your terminal!
Terminal Emulator Software Comparisons
Choosing the right terminal emulator can significantly impact your productivity. A crucial aspect of this choice often revolves around how well the emulator manages screen size and resolution. This post will delve into the screen size customization options offered by three popular terminal emulators: iTerm2, Konsole, and GNOME Terminal.
Screen Size Customization Options in Popular Terminal Emulators
The ability to adjust screen size and resolution is paramount for comfortable and efficient terminal usage. Different emulators offer varying degrees of flexibility in this regard. The following table summarizes the screen size customization capabilities of iTerm2, Konsole, and GNOME Terminal.
| Emulator Name | Minimum Size | Maximum Size | Resolution Adjustment Methods |
|---|---|---|---|
| iTerm2 | Essentially limited by system resources; practically very small | Limited only by system resources; practically very large | Manual resizing, profiles with pre-set dimensions, zoom functionality, custom font sizes |
| Konsole | System-dependent minimum, but generally quite small | System-dependent maximum, but generally quite large | Manual resizing, configuration options for font size and window geometry |
| GNOME Terminal | Similar to Konsole, system-dependent but generally allows for small windows | Similar to Konsole, system-dependent but generally allows for large windows | Manual resizing, configuration options for font size and window dimensions |
Scaling and Font Size Adjustments
Each emulator handles scaling and font size adjustments differently. iTerm2 provides a robust zoom feature that scales the entire terminal content, including text and images, while allowing for independent font size adjustments. Konsole and GNOME Terminal primarily rely on font size adjustments to control text scaling. Changing the font size directly impacts the displayed text size, potentially requiring manual window resizing to maintain optimal viewing.
iTerm2’s approach offers greater flexibility and visual consistency across different font sizes. Konsole and GNOME Terminal might require more manual intervention to achieve the perfect balance between font size and window dimensions.
Advantages and Disadvantages of Different Approaches
iTerm2’s integrated zoom functionality provides a seamless scaling experience, adapting well to different screen sizes and resolutions. However, excessively large zoom levels can lead to blurry text. Konsole and GNOME Terminal’s reliance on font size adjustments offers more granular control over text size but can necessitate more manual resizing of the terminal window to avoid text overflow or excessive whitespace.
The simplicity of Konsole and GNOME Terminal’s methods might be preferable for users who prefer a less feature-rich approach. Conversely, iTerm2’s approach caters to users who require more dynamic screen size management and smoother scaling.
Utilizing Terminal Multiplexers for Enhanced Screen Management
Terminal multiplexers are invaluable tools for anyone who regularly works with the command line. They dramatically improve workflow efficiency by allowing you to manage multiple terminal sessions within a single window, a significant advantage when dealing with complex tasks or numerous applications. This eliminates the need for constantly switching between windows or tabs, leading to a more streamlined and productive experience.Managing multiple terminal sessions efficiently is crucial for tasks requiring simultaneous monitoring of processes, running lengthy scripts, or working on several projects concurrently.
Terminal multiplexers provide the framework for this efficient management, transforming a potentially chaotic environment into a well-organized workspace. They allow you to keep track of numerous processes and commands, all within a single, manageable window.
Creating and Managing Split Panes
Terminal multiplexers, such as tmux and screen, offer the ability to divide your terminal window into multiple panes. This is achieved through simple commands. For instance, in tmux, `Ctrl+b %` will split the current pane horizontally, and `Ctrl+b “` will split it vertically. These commands allow you to customize your workspace to perfectly fit your needs, whether you need to monitor logs alongside your code editor, or run several instances of a program simultaneously.
Each pane acts as an independent terminal session, allowing you to run different commands and programs concurrently without losing track of any of them. Navigation between panes is also straightforward, typically using keyboard shortcuts. For example, in tmux, `Ctrl+b arrow keys` will move the focus between panes. Resizing panes is equally simple; in tmux, `Ctrl+b` followed by `Shift+arrow keys` will resize the active pane.
Workflow Example: Managing Large Amounts of Terminal Output
Imagine you’re running a large-scale build process that generates copious amounts of log output. Without a multiplexer, you’d be forced to either constantly scroll through a single terminal window or open multiple separate windows, quickly losing track of what’s happening. With a multiplexer like tmux, you can dedicate one pane to the build process, another to monitoring system resources (using tools like `top` or `htop`), and a third to editing configuration files or running other related tasks.
I’ve been wrestling with getting the perfect terminal screen size lately – it’s amazing how much a little extra space can impact productivity! This got me thinking about development environments in general, and how much easier things become with the right tools. I recently read a great article on domino app dev the low code and pro code future , which highlighted how streamlined development can be.
Ultimately, whether it’s a wider terminal or a better development platform, the goal is the same: more efficient workflow. Back to those terminal settings though… I think I’ll try a different resolution.
This allows you to actively monitor the build process while still having access to other tools and information. If the build process produces errors, you can quickly switch to the log pane to investigate, all without interrupting other active tasks. The ability to detach from a tmux session (using `Ctrl+b d` in tmux) and reattach later is also invaluable.
This allows you to leave long-running processes running in the background without having to keep your terminal open. When you return, the session is exactly where you left it. This workflow is considerably more efficient and organized than managing multiple separate terminal windows. This approach ensures a clear and organized workspace, even when dealing with complex and demanding tasks.
Resizing and Re-arranging Terminal Windows within a Desktop Environment
Efficiently managing terminal windows is crucial for productivity, especially when working with multiple applications or projects concurrently. The ability to quickly resize and rearrange these windows directly impacts workflow and overall usability. Understanding the various methods available within different desktop environments is key to optimizing your terminal experience.
Resizing and repositioning terminal windows is generally straightforward, but the specific methods vary depending on your desktop environment. Common techniques involve using the mouse to drag window borders and corners, keyboard shortcuts, or employing advanced window management features.
Methods for Resizing and Moving Terminal Windows
Several methods exist for manipulating terminal window size and position across popular desktop environments. The following list details common approaches, highlighting the differences in technique.
- GNOME: GNOME offers standard window management features. Users can resize windows by dragging the edges or corners, and move windows by clicking and dragging the title bar. GNOME also supports keyboard shortcuts like Alt+Tab for switching between windows and Super+Arrow keys for moving windows to edges of the screen.
- KDE Plasma: KDE Plasma provides similar functionality to GNOME, with mouse-based resizing and moving, along with extensive keyboard shortcuts customizable through the system settings. KDE’s advanced window management options, including virtual desktops, can significantly enhance workspace organization.
- macOS: macOS utilizes a slightly different approach. Resizing and moving windows are primarily done using the mouse, with options for maximizing and minimizing windows. Keyboard shortcuts are also available, though the specific combinations might differ from other desktop environments. For instance, using the green button maximizes the window, and the yellow button minimizes it to the dock.
Window Snapping and Tiling Window Managers
Window snapping and tiling window managers offer advanced methods for optimizing screen real estate. These tools automatically resize and position windows to fill available space efficiently, minimizing wasted screen area and improving overall visual organization.
Window snapping allows users to quickly “snap” a window to one or more edges of the screen, instantly resizing it to occupy a portion of the display. Tiling window managers go a step further by automatically arranging windows in a grid-like pattern, maximizing the use of screen space. Popular tiling window managers include i3, xmonad, and awesomeWM.
Conflicts Between Terminal Emulator Settings and Desktop Environment Window Management, More options for terminal screen size
Potential conflicts can arise between the terminal emulator’s settings and the desktop environment’s window management features. For example, if a terminal emulator is configured to always open at a specific size or position, this might conflict with a tiling window manager’s automatic window arrangement. Similarly, certain terminal emulators might not fully respect the desktop environment’s window snapping behavior, leading to inconsistencies in window placement and sizing.
These conflicts are often resolved by adjusting the terminal emulator’s settings to allow for greater flexibility or by carefully configuring the desktop environment’s window management options. Understanding the interplay between these two layers is key to avoiding these issues and achieving a smooth and efficient workflow.
Advanced Techniques for Maximizing Terminal Screen Real Estate
We’ve covered the basics of terminal size and multiplexing, but true terminal mastery lies in squeezing every pixel for maximum productivity. This involves a nuanced understanding of your terminal’s features and a willingness to customize for optimal efficiency. Ignoring even seemingly small details can significantly impact your workflow over time.
Efficiently managing your terminal screen real estate is crucial for maintaining focus and preventing visual clutter. This is particularly important when working with multiple terminal windows or complex applications. By employing advanced techniques, you can significantly improve your productivity and reduce eye strain.
Efficient Status Bar Usage
Status bars, while informative, often consume valuable screen space. The key is to strategically utilize their features. Some terminal emulators allow customization of what information is displayed, enabling you to show only essential data like the current directory, git branch, or virtual environment. Hiding less critical information frees up space for your actual work.
- Disable unnecessary status bar components: Many status bars display the time, battery level, or other system information that might be readily available elsewhere. Removing these elements can reclaim several lines of screen real estate.
- Minimize status bar height: If your terminal emulator allows it, reduce the height of the status bar itself. Even a small reduction can accumulate noticeable gains over time.
- Conditional display: Some terminal emulators offer options to only show the status bar when needed, such as when the mouse hovers over the bar or when a specific key combination is pressed. This provides a flexible way to balance information access with screen space optimization.
Hiding Unnecessary Elements
Many terminal emulators include features that, while useful in certain contexts, can contribute to visual clutter. Disabling these features when not actively needed can significantly improve screen real estate.
- Scrollbars: Unless actively scrolling, scrollbars often consume unnecessary horizontal or vertical space. Many emulators offer the ability to hide them automatically or on demand.
- Tab bars: If you’re only working in one terminal window, a tab bar is redundant. Hiding it frees up a line or two of valuable screen space.
- Toolbars: Similar to tab bars, toolbars can be disabled if their functionality is readily accessible through keyboard shortcuts or other means.
Readability vs. Maximized Screen Real Estate: A Trade-off
While maximizing screen real estate is desirable, it’s crucial to balance it with readability. Cramming too much information onto the screen can lead to eye strain and reduced comprehension. Finding the sweet spot involves experimentation and personal preference. Factors like font size, line spacing, and color schemes play a significant role.
For example, using a smaller font size will increase the amount of text displayed but may make it harder to read. Similarly, reducing line spacing increases the density of text, which can also negatively impact readability. A balance must be struck.
Custom Themes and Color Schemes for Enhanced Clarity
Custom themes and color schemes can dramatically improve the visual clarity of your terminal and reduce visual clutter. Well-chosen colors can enhance readability, highlight important information, and reduce eye strain. Many terminal emulators support custom themes or allow integration with theme managers, providing a wide array of options.
- High contrast schemes: High contrast color schemes are particularly effective for reducing eye strain, especially during long sessions. They clearly differentiate text from the background.
- Color coding for different elements: Assigning distinct colors to different elements, such as file types, directory structures, or output levels (e.g., error messages), can significantly improve the readability and understanding of complex information.
- Dark mode: Dark themes are generally preferred for reducing eye strain in low-light conditions.
Impact of Screen Resolution and DPI Settings
Screen resolution and DPI (dots per inch) settings significantly influence the visual experience within your terminal, directly affecting the size and clarity of text. Understanding this relationship is crucial for optimizing your terminal environment across various displays and setups. A higher resolution generally means more pixels available, allowing for a larger terminal window with more characters displayed, while a higher DPI setting packs more pixels into a given physical area, making everything appear smaller.
The interplay of these two factors determines the effective size of your terminal window and the readability of its content.The effective size of your terminal window is determined by the number of pixels available on your screen (resolution) and how densely those pixels are packed (DPI). A high-resolution screen (e.g., 1920×1080) offers more space for your terminal, allowing for wider windows and more lines of text.
Conversely, a lower resolution (e.g., 1280×720) will limit the maximum size of your terminal window. However, even with a high-resolution screen, a high DPI setting will shrink the appearance of everything on screen, including the terminal text, potentially leading to smaller and harder-to-read characters. Imagine a 1920×1080 screen; at a low DPI, you’ll see large, easily readable characters in your terminal.
At a high DPI, those same characters will be significantly smaller, even though the resolution remains unchanged.
Screen Resolution and Terminal Window Size
Different screen resolutions directly impact the maximum usable size of your terminal window. On a 4K display (e.g., 3840×2160), you can comfortably fit a much larger terminal window compared to a standard 1080p display (1920×1080). The available screen real estate directly translates to the number of characters and lines you can display simultaneously. For example, a terminal running at 80 columns and 25 rows on a 1080p screen will appear significantly smaller than the same terminal on a 4K screen.
This difference is purely a matter of the available pixel space. The same terminal configuration will occupy a proportionally smaller area of the screen on the higher-resolution display.
DPI Settings and Text Size
DPI settings independently affect the apparent size of the terminal text, regardless of screen resolution. A higher DPI setting makes everything on the screen appear smaller, including the characters in your terminal. This means that even on a high-resolution screen, a high DPI can result in a terminal with small, difficult-to-read text. Conversely, a low DPI setting will make the text appear larger and more readable, but may limit the amount of information visible on the screen at once.
Consider a terminal configured to display 100 characters per line. At a low DPI, these characters will be large and spacious. At a high DPI, the same 100 characters will appear crammed together, requiring more focus to read.
Adapting Terminal Settings to Different Screen Resolutions and DPI Settings
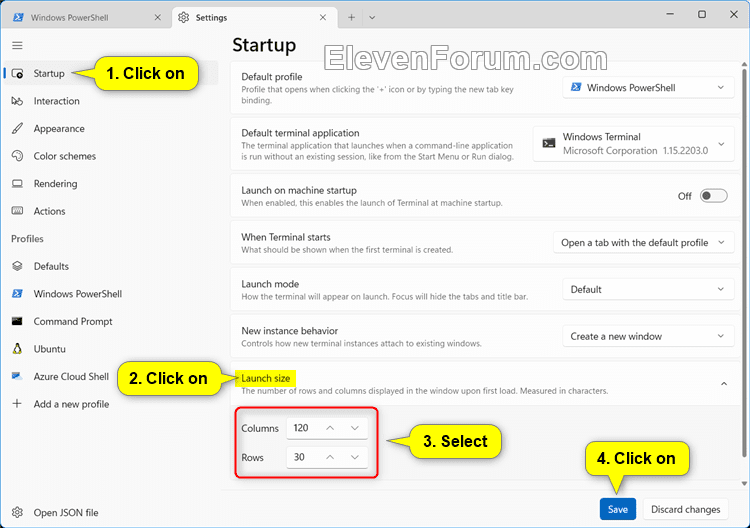
To maintain optimal readability and usability across various screen configurations, you should adjust your terminal settings accordingly. Most terminal emulators allow you to adjust font size, which is crucial for compensating for different DPI settings. On high-DPI displays, increasing the font size is necessary to maintain readability. Conversely, on low-DPI displays with limited screen real estate, you may need to decrease the font size to maximize the visible information.
Furthermore, some terminal emulators offer features to automatically adjust font size based on the system’s DPI setting, providing a more consistent experience across different displays. Additionally, consider using terminal multiplexing tools to efficiently manage multiple terminal windows and adjust their sizes based on the available screen space and DPI setting. Experimentation with font sizes and terminal emulator settings will help you find the best configuration for your specific needs and display.
Epilogue: More Options For Terminal Screen Size
So there you have it – a comprehensive guide to conquering your terminal screen real estate! From choosing the right emulator and tweaking fonts to mastering multiplexers and utilizing advanced techniques, you now have the knowledge to transform your terminal experience. Remember, a well-configured terminal isn’t just about aesthetics; it’s a crucial component of a streamlined and efficient workflow.
Experiment, find what works best for you, and enjoy the enhanced productivity that comes with a perfectly tailored terminal environment. Happy coding (or whatever terminal-based magic you’re working on)!
FAQ Compilation
Can I use different font sizes in different terminal tabs or windows?
Yes, most terminal emulators allow for per-tab or per-window configuration settings, letting you customize font size independently.
What if my terminal text looks blurry?
Blurry text often indicates a mismatch between your font size, DPI settings, and screen resolution. Try adjusting your font size or DPI to find a sharper image. Using a higher-resolution font can also help.
How do I save my terminal settings so I don’t have to reconfigure them every time?
Most emulators allow you to save your settings in a configuration file (often a `.json`, `.yaml`, or `.ini` file). The location of this file varies by emulator; check your emulator’s documentation for specifics.
Are there any security implications to consider when customizing my terminal?
Generally, customizing your terminal’s appearance doesn’t pose any security risks. However, be cautious when installing third-party themes or plugins, ensuring they come from reputable sources to avoid malware.