For years, the pursuit of flawless 3D prints has been a familiar struggle for enthusiasts and professionals alike. The moment of realization often comes with a sigh, as a meticulously designed and perfectly fitting model is revealed to be marred by subtle, yet undeniable, horizontal lines. These "print lines," a byproduct of the layer-by-layer additive manufacturing process, have long been perceived as an inherent flaw, necessitating laborious post-processing techniques like sanding. However, a growing consensus within the 3D printing community suggests that the fundamental understanding of why these lines are so apparent may be the key to a more elegant and efficient solution. This article delves into this paradigm shift, exploring the science behind visible print lines and presenting a novel workflow that prioritizes surface texture over laborious material removal.
The Illusion of Flaw: Why Print Lines Become Obvious
The initial approach to mitigating visible print lines has historically been sanding. This method, while effective on flat surfaces with ample time, presents significant challenges for complex geometries. The core of the problem, as articulated by experienced makers, lies not in the print lines themselves, but in the stark contrast they create against a uniformly blank surface.
"A print line is a regular, repeating feature sitting on a smooth surface," explains a seasoned 3D printing consultant who prefers to remain anonymous, having witnessed countless hours dedicated to post-processing. "Evenly spaced ridges, plain background. Your eye is built to catch a regular pattern against a blank field, and that contrast is the thing that reads as 3D printed. The lines are not ugly on their own. They are ugly because there is nothing else on the surface."
This observation forms the bedrock of a new philosophy in 3D print finishing. Instead of focusing on the removal of the offending ridges – a process that can be time-consuming and detrimental to fine details, particularly on organic shapes, figurines, or ergonomic grips – the alternative is to alter the surrounding surface. By introducing an irregular, non-uniform texture, the stark contrast that makes print lines conspicuous is diminished. This can range from simulating natural materials like wood grain or stone to replicating fabricated textures such as stipple or woven cloth.
The effectiveness of this approach is readily observable. A planter with an integrated stone texture, for instance, appears "finished" directly off the print bed. The inherent texture masks the layer lines, allowing the object to be perceived as complete. Conversely, a smooth-surfaced planter, regardless of how precisely the printer is calibrated, will often reveal its manufactured origins through the persistent visibility of print lines.
The Evolution of Post-Processing: From Abrasives to Surface Embellishment
For the better part of a decade, the 3D printing industry has grappled with the challenge of achieving a "made" aesthetic rather than a "printed" one. Early adopters and hobbyists often spent significant amounts of time meticulously sanding their prints. This process, particularly for intricate models, could easily consume hours, if not days, per object. The workflow typically involved a progression through increasingly finer grits of sandpaper, often followed by the application of primers and further sanding.
"I spent about two years sanding print lines off models before I admitted the whole approach was backwards," confesses a maker who has since become an advocate for texture-based solutions. "If you print anything you care about, you know the moment. Geometry is clean, fit is right, color is right. Then you turn it toward the light and every flat face is covered in fine horizontal print lines. The part is good. It just looks printed, and you wanted it to look made."
The limitations of sanding become particularly acute when dealing with complex, organic, or highly detailed models. Each pass of sandpaper, while smoothing, also has the unintended consequence of rounding off sharp edges and eroding fine features. This can result in a model that is smoother but also softer and less defined than the original digital design. The realization that sanding was not merely time-consuming but actively destructive to detail led many to seek alternative methodologies.
The transition from a subtractive approach (sanding) to an additive or integrated approach (surface texturing) represents a significant evolution in 3D print finishing. This shift acknowledges that the perceived imperfection is a consequence of visual perception and the absence of competing visual information on the surface.
The Digital Sculpting Hurdle: Blender and the Steep Learning Curve
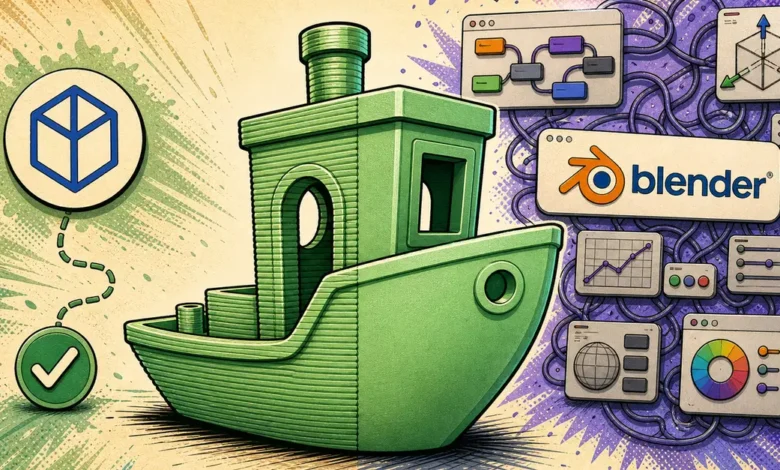
For those venturing into digital sculpting and texturing, software like Blender has long been the go-to solution. Blender, a free and open-source 3D creation suite, offers powerful tools for manipulating geometry, including displacement and remesh modifiers. These modifiers can be used to add intricate surface details that effectively mask print lines.
However, the accessibility of these powerful tools has been a significant barrier for many. Blender boasts a notoriously steep learning curve. Mastering its functionalities, from understanding UV mapping and texture coordinates to navigating complex modifier stacks, can demand a considerable investment of time and effort. For the average 3D printer user, who may not have a background in digital art or 3D modeling, the prospect of learning Blender for the sole purpose of texturing prints can be daunting.
"The textbook answer is a displacement or remesh modifier in Blender, and I gave it a real try," recounts a user who experienced this frustration. "Blender is free and it is powerful. It is also a steep learning curve. Remeshing, UVs, texture coordinates, modifier stacks, an evening or two the first time you do it, and not something you can hand to someone else, because running Blender headless from a script is its own project." This personal anecdote highlights the practical challenges of integrating advanced 3D modeling software into a typical 3D printing workflow, particularly when aiming for efficiency and broader accessibility.
A Streamlined Workflow: Texture as Geometry
The breakthrough for many has come with the development of more accessible and integrated texturing workflows. The principle remains the same: introduce competing visual information to mask the print lines. The innovation lies in the method of application. Instead of relying on complex external software, the focus has shifted to tools and techniques that directly embed texture as real geometry within the 3D model itself.
The current streamlined workflow, as described by proponents, involves a significantly shorter process:
- Selection of a Texture: This is the initial step, where the user chooses a desired surface texture. This could be a pre-existing library of textures, a custom-designed pattern, or even a photographic source that is converted into a heightmap. The key is that the texture should be irregular enough to break up the uniformity of the print lines.
- Application of Texture as Geometry: This is the critical phase where the chosen texture is applied to the 3D model, not as a visual overlay, but as actual geometric displacement. This means the surface of the model is physically altered to incorporate the texture’s peaks and valleys. This is often achieved through dedicated plugins or specialized software designed for direct texturing of existing 3D models. The process aims to be intuitive, often involving simple brush-like tools or automated application based on model curvature.
- Export and Slicing: Once the texture is embedded as real geometry, the modified 3D model is exported in a standard format (such as STL or OBJ). This file is then directly loaded into any standard 3D printer slicer software.
The profound advantage of this method is that the texture becomes an integral part of the model’s geometry. This means it survives the slicing process and is faithfully reproduced by the 3D printer, regardless of the filament type or the specific slicing software used. This approach eliminates the need for specialized rendering or complex post-processing steps after printing. The object emerges from the print bed with its surface already textured, effectively masking the print lines.
"Because the relief becomes real geometry and not a painted-on image, it survives slicing and prints on any filament through any slicer," states a developer of one such texturing tool. "Nothing to install, no account, which is the only reason it actually stuck as a habit." This emphasis on ease of use and universal compatibility underscores why this method is gaining traction.
Key Considerations for Effective Texturing
While the concept of texturing to mask print lines is straightforward, several factors can influence the success of this approach:
- Texture Resolution and Detail: The chosen texture needs to have sufficient detail and complexity to effectively compete with the print lines. Very coarse or simplistic textures might not provide enough visual disruption. Conversely, excessively fine textures might not be resolvable by all 3D printers, especially those with lower native resolutions. The optimal balance depends on the printer’s capabilities and the desired aesthetic.
- Texture Scale: The scale of the texture relative to the model is crucial. A texture that is too large might appear abstract and out of place, while a texture that is too small might not be effective in hiding the layer lines. Users often experiment with different scaling factors to find what works best for a given model.
- Application Method: The way the texture is applied to the model can significantly impact the final result. Some methods might be better suited for organic shapes, while others excel on hard surfaces. Understanding the strengths and weaknesses of different texturing tools or plugins is important. For instance, some tools allow for procedural generation of textures, offering greater control and variety.
- Printer Calibration and Settings: While texturing aims to reduce reliance on perfect printer calibration for aesthetics, a well-calibrated printer still produces better results. Consistent layer adhesion, accurate extrusion, and proper bed leveling contribute to a cleaner base upon which the texture can be applied and perceived. Even with a textured surface, significant printing errors can still detract from the overall quality.
- Material Properties: The material used for printing can also play a role. Some materials, like certain flexible filaments or those with inherent matte finishes, might naturally exhibit less pronounced print lines. However, the texturing approach is largely material-agnostic, offering a consistent solution across a wide range of filaments.
The Future of 3D Print Finishing
The paradigm shift from "removing flaws" to "embracing texture" represents a significant evolution in the 3D printing workflow. It acknowledges that what we perceive as a flaw is often a consequence of visual contrast and that by strategically altering the visual landscape of a print, we can achieve a more polished and professional aesthetic with less effort.
This approach not only saves time and effort but also preserves the intricate details of the original digital model, which would otherwise be compromised by abrasive post-processing. As 3D printing technology continues to advance, and as software tools become more user-friendly, the integration of surface texturing as a standard part of the finishing process is likely to become increasingly prevalent.
The journey from painstakingly sanding away imperfections to intelligently embedding surface relief highlights a maturing understanding of both the technology and human perception. Print lines were never an inherent defect to be ground out; rather, they were a signal of a blank canvas awaiting artistic intervention. By giving the rest of the surface a pattern too, the print emerges from the bed already looking finished, a testament to a more elegant and effective approach to 3D print post-processing. This methodology promises to democratize high-quality finishes, making them accessible to a wider range of users and applications, from hobbyist creations to professional prototypes and end-use parts.